
Embroidery Stitch Tutorial


first of all make 3 long stitches in a rough triangle shape, and with overlapping corners.

Next make a ring of stitches around the triangle, crossing the corners and building up more sides…

…as you go round. Once you’ve gone round a few times the rose shape will emerge.


I do find it difficult to take clear photos of such small details (even though I do have my camera set on the macro setting, before you ask!) but hopefully these will give you an idea of how you keep going around and around…
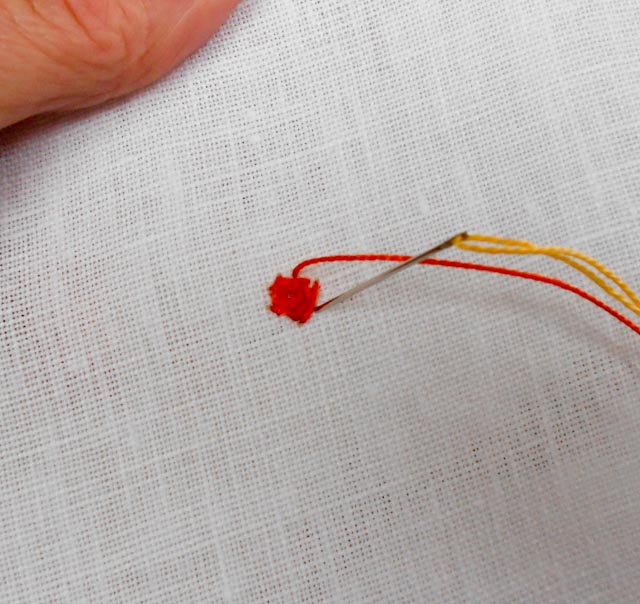
…overlapping the corners and sides as you go.

The bigger it gets, the more like a rose it looks!

Have a play around and make your own rose – they are really fun to do and very effective!
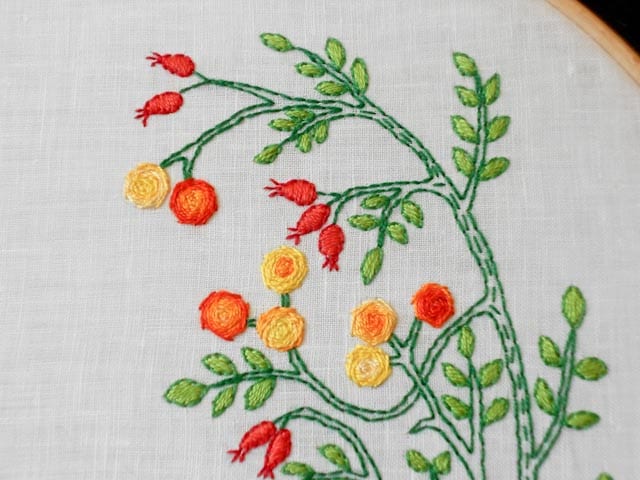
That photo at the top of the page is a sneak peek of a new embroidery I have been working on. I will reveal all when it has reached it’s new owner!

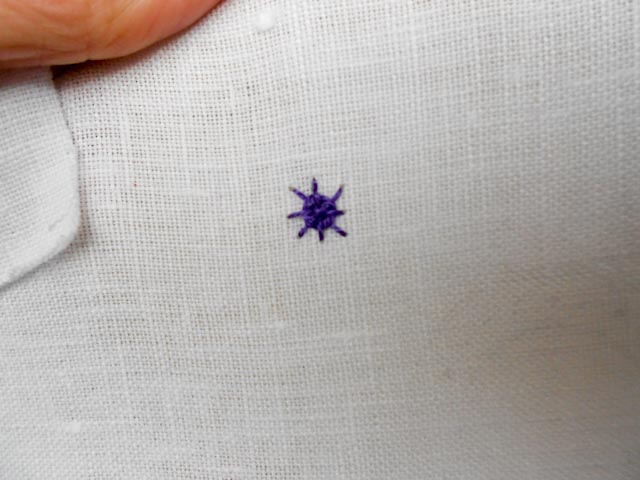
Another stitch that I used in the Sampler Tree which isn’t so familiar (found again on google somewhere) is the wheel stitch. This is really quite simple but effective and a bit different.

First of all make a star stitch (4 long stitches to make a star shape)

Then begin to weave your thread in and out of the star stitch points. Keep going until you’ve built up a nice ‘wheel’ but you can still see the spokes.
One more stitch from the sampler tree. This is a combination of 2 stitches, fly and chain. I have come to love both of these. To start with I didn’t really see the point of all these different stitches but they are so nice to do!

First of all make a detached chain stitch, then take your needle up to make a start on a fly stitch that will ‘cup’ the chain stitch.

I am hoping these (surprisingly clear) photos will explain all as I don’t know whether I can explain it in words!

So you make a chain and then you make a fly stitch beneath and end with a tiny stitch.

Voila!


On Sunday I hosted a ‘sewing day’ at my craft Studio for a handful of other Scottish Bloggers. There were 7 of us in total (Sarah Whoopeedoo couldn’t make it unfortunately) and we all had such a lovely time sharing our projects, techniques, wisdom and cakes! From left to right here is Fiona, Julie, Katy, Lynz, Jenny (Sarah’s mum) and Sarah. Thanks so much for coming girls! Oh and Happy Birthday Lynz!!
Oh look, the lone photo lol I'm a bit worried I look like Muttley in this pic, I wonder what I was up to… ;o) Thanks again for hosting, it was a fab day :o)
Thanks so much for hosting, it was a great day! Never noticed the camera though…sneaky. Look like I have a dozen chins.. thanks… lol
Ha ha, how furtive does Katy look!!! I'm stealing this, Jo, just so you know. I'll try and remember my camera for the next one. *hint hint*
GREAT tutorial! It looks like nothing to begin with and then *pow* there's a rose. Thank you!!
Thanks for sharing. Those roses look fab must have a go at them. The last photo is fab. I was quite jealous when I heard about that get together. Some of my favourite bloggers all getting together to stitch and eat cake – perfect way to spend a day!!!
Lovely post- great stitches to learn and practice and friends stitching together! Thanks for sharing !
Stitch…eat cake…and…ahem…drink?:) Hahahahaha!:)xo
I haven't started on the Sampler Tree yet as I still haven't had the time to buy more floss. I will come back to this tutorial once I start. Looks like you had great fun, it's a shame you're so far away.
Thank you for taking the time to do this, especially the rose, which i asked about. It's amazing how effective a result you get from a few simple in the right combination.
Teresa x
No idea how you managed to remember to take a photo alongside everything else! Thanks so much for organising.
Beautiful stitches, I'm really hoping to get my head around embroidery sometime soon. Just need to finish off 101 other things first – or at least some of them! Juliex
Thanks for a lovely day Jo, I've learnt so much and feel really lucky to have been included. What a great bunch of girls you all are.
Great tutorial, and very timely – think I'll be using it very soon !
How lovely! Thanks for the tutorial, I really would like to make a good start with embroidery. I've done a little, but never really finished anything I liked. These are beautiful and inspiring stitches!
Gorgeous stitches! I love the get-together photo – what mischief was Katy making?!
Just love your embroidery Jo! Thanks for sharing these stitches with us. On my 'to do list' that's for sure. Also loving the new clean look to your blog 🙂
Brilliant thank you! Can't wait to try that rose!
Oh thanks for that tutorial. I am loving my stitching these days but do tend to stick to the tried and true miniature repertoire of stitches I have. And that photo of all of you having fun is fab.
It's hard to believe that something that starts us in such a messy way can become so beautiful! There's hope for us all! 😉
I saw the same pic and used the same technique to try and replicate it. XD
Thanks so much for this! I'm trying to make some plushy toys but I really hate eye beads, and being inexperienced with stitching I didn't know what to look for ^^ this is a great tutorial, thank you! <3
Great tutorial ! It is nice to see all the work that goes into just one step of completing one of your cute blankets.By the way, your sewing space looks pretty organized to me!
I could use to put her boys and their families but I couldn't find any. It seems like those tree murals are all the rage, but I wanted to embroider mine so I needed something dainty and pretty. best quilting sewing machine
It proved to be very helpful to me and I am sure to all the commenters here! It’s always nice when you can not only be informed, but also entertained!.. Thanks for all your help and wishing you all the success in your business. Click here if you want to visit our site
it difficult to take clear photos of such small details (even though I do have my camera set on the macro setting Best Reverse Osmosis System Reviews
you can just see the raised rose stitch. It wasn't a lot to go on but it looked just the sort of thing I was looking weight bench reviews 2016
This little tee took only about an hour…plus time to cut the pattern out. I made a second one in a lightweight. chambray that I have not photographed Best pressure washer for the money
Wow, that’s what I was looking for, what a stuff! existing here at this blog, thanks admin of this site and i have blog about healthy living, please visit it!!!
Really great tutorial, just what I need to get me started, thanks. xl400
Your article covers all the major aspects of the topic. Simply amazing. embroidery digitizing