
Bedding Plants QAL 1 – The Rose Row

Welcome to part 1 of the Bedding Plants QAL!
We’ll begin by making the Rose Row. I’ll be sharing step images and tips as well as instructions for making the first of my new small projects, the Rose Cross Cushion! But first let’s take a look at some of the other issues that might come up before stitching begins. For more information about this QAL please read the introductory post here.
Choosing Fabrics
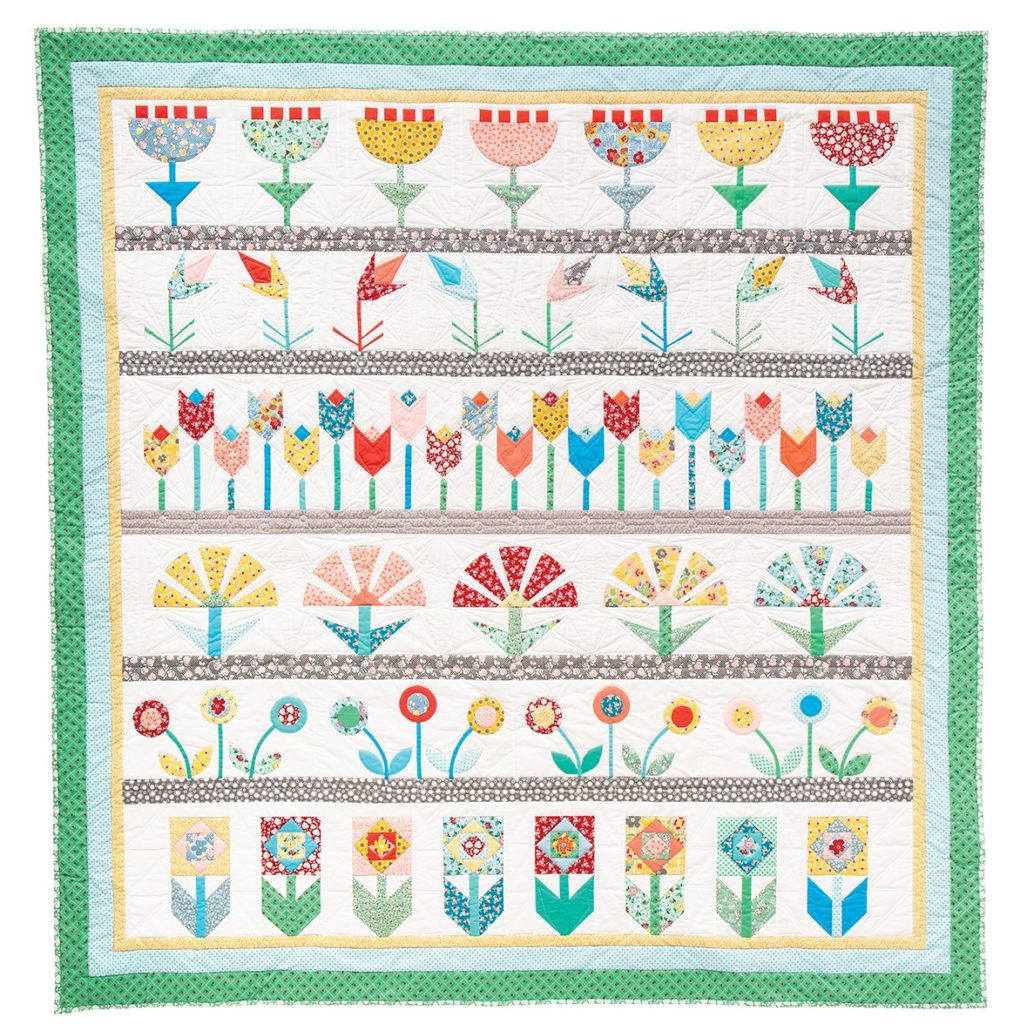
For the original book version of this quilt I chose vintage style fabrics from Riley Blake, along with some matching solids and a classic Kona Snow background. This look works really well but a cream background and any sort of small prints would be a successful choice and this pattern offers plenty of opportunity for using up your scraps!
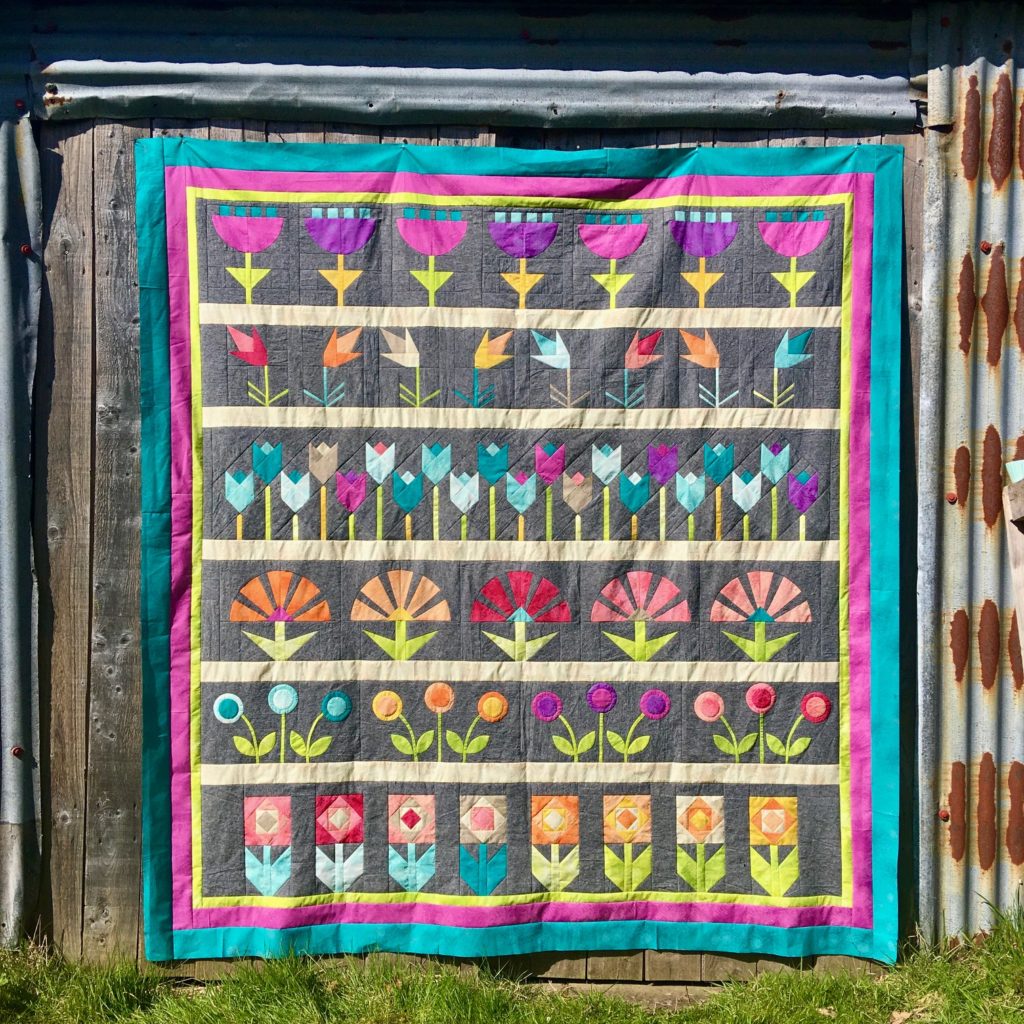
For the second version I used the Floral Elements range of blenders by Art Gallery Fabrics in rich bright colours, pairing it with Essex Linen Yarn-dyed in Black (which really appears as a grey). This gives a much more vibrant modern vibe. I love both approaches but there are plenty of other ways you could go. If you’re the sort of person who organises their scrap in to colous then why not pick a colour for each of the rows and make it really scrappy but in an organised way? You could also really restrict your palette to just a couple of colours, I actually think this would be a gorgeous quilt worked in just blues and white.
For my sample today I thought I would go ombre and make the roses each from a different colour with gentle gradations of shade. I wanted it to look like a real rose with a darker centre and light petals on the outside. I paired this with low and high volume fabrics. I think the whole quilt could be stunning made this way! I hope this has given you a few ideas if you are still choosing your fabrics.
Pre-wash or not?
Edited with new advice from lovely quilters:
Jane sent me a link to this very helpful post by Emily Dennis all about stitching with Essex linen.
Cat told me the following:
I made an Elizabeth Hartman quilt with various cottons and linen as the background. I didn’t prewash but I did wash it afterwards and I know that the recipients have washed it since and it looked no different after washing
As a rule I don’t pre-wash my quilting fabrics. I tend to only buy good quality craft cottons that don’t need pre-washing. However there are exceptions and one of them is a linen/cotton mix such as Essex linen. I have used this before in quilts and haven’t pre-washed (mainly because I didn’t think of it in time!), I’ve then been too scared to wash them! I have washed quilts with a small amount of Essex linen and have had no issue at all. But mixing such a large amount with a very different weight of fabric made me a little nervous so I decided to pre-wash my yardage for this new version.
First of all I would say it definitely shrinks (but I still had enough fabric from the 4.75 yards) and it really frays! But it also becomes much harder to work. It never really pressed flat again and was quite bouncy and stretchy. As you can see I still manages to make a decent quilt with it but I would be hesitant to recommend that everyone pre-washes their Essex Linen due to this quite marked change in texture. It’s certainly much easier to piece when left not pre-washed.
So if you bought one of my kits and are wondering what to do I really don’t know what the best advice is! Perhaps anyone that has experience of washing a quilt made with Essex Linen that hasn’t been pre-washed could share their thoughts in the comments. Sorry I can’t give you a more decisive outcome here but I am still in two minds and feel I need to experiment more.

Cutting out
I don’t usually make quilts using other people’s patterns, or even my own patterns. I really find it hard to follow instructions even if I actually write them in the first place! So when I re-made this quilt I did curse quite a lot. Luckily I had a fantastic technical editor for this book Helen Frost, who whipped my pattern into shape and made it as easy as it can be to follow. And the best thing is it does actually work!! Phew, I was very pleased every time the measurements turned out a correctly sized block!
The point here is that I don’t know what most people do when working on a quilt pattern but there is no way I would ever cut everything out to start with (one) because I might change my mind once I started putting it together and (two) because I would go insane doing all that cutting in one go!! So I tackled this new version of the quilt a row at a time and in fact I always made just one block to start before cutting for the rest of the row. I think this is a sensible approach but it’s even more relevant if you are dipping in to the QAL to just make a block or two. The rose block is a great one to start with as you can find out all the sizes you need from the assembly instructions without referring to the cutting list. In any case the cutting list is divided up into the separate rows which should mean it’s relatively easy to make just one or two blocks of a flower (especially if you are better at following patterns than I am!).

Rose Blocks
The rose is probably the most simple block and gives us a chance to warm up and gain some confidence before moving on to trickier techniques.
The nice thing about being able to write these accompanying blogposts is it gives me space to do a little step tutorial and discuss all sorts of finer points that we wouldn’t have had room for in the book.
Just a note that this is not a stand alone tutorial but will accompany the instructions in the book, so I’m not giving you any dimensions for cutting and trimming the actual rose block, you will need to refer to the book for these. So let’s get started!


I took photos as I made one of these new roses so I could talk you through it.
When you lay your first two triangles either side of your centre square just make sure you centre them by checking that the dark triangles poking through from the centre square are symmetrical.
Once stitched and press open trim away the excess fabric as shown above right. I always press my seams to one side but this is very much a personal choice.


Add the triangle to the other side, again eyeballing the symmetry of those peeping through tiny dark triangles. Once stitched and pressed it’s time to trim. Line up your ruler so that you have just over a quarter inch of seam allowance beyond the corner points as indicated by the arrows on the left.


This block is not designed so that the square sits exactly inside the next like an Economy Block, instead the squares have a looser fit that I thought would more resemble a flower.
Add the triangles from the next layer of petals, centering on the poking through points from below again.


Trim again, exactly as the first round, lining up the quarter inch lines on your ruler so that there is equal space next to each point. I like these Sew Easy square rulers as they have an unbroken quarter inch lines all the way around the outer edge. You can also use the vertical and horizontal lines on your ruler to aid you here, lining them up with the centre square.


One last layer to add and trim again. There is quite a bit to trim from this last layer, but line up your points for trimming in the exact same way as before.
If you are making the regular rose blocks you can now add your strip of background above BUT if you are making the new cushion project then leave this piece.
Tips
Cutting the squares in half to give you triangles means there are lots of bias edges in these blocks so be really careful not to stretch them as you piece.
If you are making a whole row of rose blocks or even just three or four you might find it quicker to piece each of the stages for all the blocks like a production line. I did this for the three blocks that I didn’t use for the images, and this also meant I could chain piece them as shown below.

Now it’s time to make our leaves and I’ve got a really nifty little tip for you to help cut down on fabric waste. But first let’s look at the regular way to piece our leaves.


We start by marking a diagonal line on the back of our background squares and laying two of them RST on top of the leaf rectangle.
Make sure that the diagonals are sloping the same way and sew along the lines. Trim a quarter inch beyond the sewn line towards the corner and discard the excess fabric. When you make the leaf piece for the other side make sure your angles are sloping in the opposite direction.
Let’s have a look at that little fabric saving trick now…


After you’ve marked that diagonal line on the back of the background square mark another one half an inch towards the corner. Make sure this stays towards the corner and sew both lines. When you cut a quarter inch beyond the sewn line you will also get a bonus mini HST to use for something else (or just to store for many years waiting for the right project!).

I decided to make my leaves and stems from the same fabric but in the original I used different fabrics for this. These are one of the things I enjoyed changing around between the two quilt versions I made, and I would definitely encourage you all to play around with these small details in the same way.
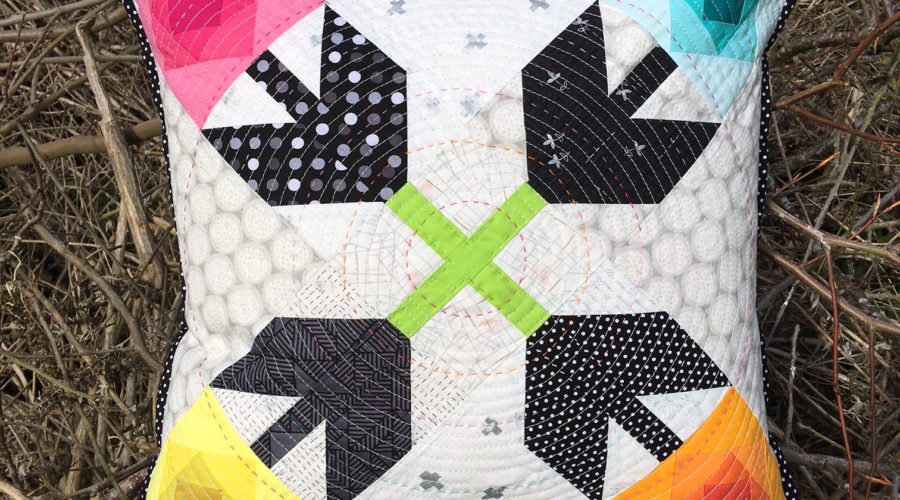
Rose Cross Cushion
This is the first of the new small projects I’ve designed using the flower blocks. This cushion uses four rose blocks but turns them on point and adds a new cross block to the centre, which I think could be the roots of the plants growing underground.
To make the Rose Cross cushion you will need:

4 Rose blocks (minus the top background strip)
Background fabric: two strips measuring 2 1/2″ x 5″, two squares measuring 4 1/4″, two squares measuring 10 3/4″
Green fabric: one strip measuring 1 1/4″ x 5″ and one strip measuring 1 1/4″ x 5 1/4″
Method
Cut the two smaller 4 1/4″ background squares in half on the diagonal to give you four triangles. Sew these to the top of each of the rose blocks. Trim dog ears at either side.


To make the centre ‘roots’ square stitch the background 2 1/2″ x 5″ strips either side of the green 1 1/4″ x 5″ strip. Cut this in half to give two pieces each measuring 2 1/2″ x 5 1/4″.
Stitch these either side of the green 1 1/4″ x 5 1/4″ strip.


Stitch the bottom edge of a rose block either side of the roots centre as shown on the left.
Cut your remaining large background squares in half on the diagonal to give four triangles. Stitch a triangle either side of the remaning two rose blocks as shown above right.
Piece the three units together to make a 21″ block. This will become a 20″ cushion so you will need a pad of that size too.

I then basted this to a piece of wadding (batting) and quilted it. I didn’t bother with any backing fabric but I know some machines don’t like the wadding directly above the throat plate so in that case you may need to use some light scrap fabric (it won’t be seen if you are making a cushion).

I chose to quilt concentric circles on my machine using a walking foot and Aurifil 28wt cotton in shade 2600. I used a stitch length of 4mm.
I started by drawing around the inside of a packing tape reel using a Hera marker. I find it difficult to quilt a smaller circle than this satisfactorily on the machine so I always do something else in the centre. I then quilted separate circles the same distance apart (approx 3/8″) but leaving some double gaps for filling with hand quilting later. I labouriously threaded all my ends through to the back afterwards and knotted them.
I used Aurifil 12wt cotton thread in shades that matched the roses and filled in the spaces with hand quilting, including a little echo quilting inside the roots cross.

I used a simple envelope closing for the back of the cushion and bound it using my single fold binding technique as shown in this tutorial.

I love the way the leaves have turned into their own geometric shape by being turned on point and the addition of the roots cross. I feel like the circle quilting adds a whole other dimension too.
All in all a very pleasing and large addition to my cushion collection! This would also make a handsome mini quilt or perhaps the centre of a medallion quilt.
The Rose Sponsored Prize!
Our sponsor for part one of the QAL is Hantex, the UK distributor of Art Gallery Fabrics, Cloud Nine Fabrics and many more of my favourite fabric companies. I have a fabulous bundle of AGF ‘The Flower Society’ collection to giveaway to one lucky participant. How perfect is this fabric line for this QAL?!

All you need to do is use the hashtag #beddingplantsQALRose when you post your Rose blocks in your feed on Instagram, or share your Rose blocks in a post in the Bedding Plants QAL Facebook group. I will choose a random winner from the combined IG and FB posts of Rose blocks. You have from now until midnight GMT Saturday 5th June to share your Rose blocks on either platform. I will draw a winner on Sunday 6th June and post in both places.
But what about that Facebook Group? Well it is now open and you can join by clicking here. I decided to try this as a public group so that you didn’t have to wait for me to let you in. Let’s just hope there aren’t any weird trolls interested in quilting flowers!!
Well I think that’s it for our first Bedding Plants QAL post! Phew!! Remember as your host I am here to help, so if you have any questions just comment below or send me an email to [email protected].
Have fun everyone and I can’t wait to see all your lovely roses!
This compliments your book . Great . I have been having fun learning to needle turn appliqué . But will stop now though and try this Daisy block. Thank you. Jenny
I’m ready to start pulling fabrics, but won’t be able to show any progress as I don’t do IG or FB, but I will put some photos on my blog. I’ll use my stash & scraps & may make a slightly smaller quilt. I don’t have trouble following patterns, just writing them up and wouldn’t I love a tech. helper so I could publish some(lol). Thanks for this QAL, take care & hugs.