
Bedding Plants QAL 2 – The Daisy Row
Welcome to part 2 of the Bedding Plants Quilt Along! I can’t tell you how happy it’s made me to see all the beautiful rose blocks popping up in my Instagram feed over the last 2 weeks, thanks so much for getting involved everyone! I’m also loving the little community we have going on in the Facebook Group, if you haven’t joined in yet just click here to join.
One of the things I didn’t anticipate is that you would all be so keen to get your blocks sewn into rows! And this prompted a question about sizes in the Facebook group. As my book was aimed at beginners (even though I would describe this quilt as intermediate for sure) I designed the quilt so that there was plenty of leeway for trimming or adding extra to the rows to make up for any piecing discrepencies.
The one row that is the ‘control’ is the daisy row which is just 4 rectangular blocks sewn together without any sashing or end strips. Having said that if you did need to trim or add a little it wouldn’t be too much of an issue. If you want to go ahead and sew your rose blocks (and subsequent flowers) together in to rows then please go ahead, but I would suggest leaving any end strips unattached until the end when we can deal with it all in the last blog post (but if you have already added those strips that’s also fine!).

As you can see I finally finished my new version of the quilt! You can read all about it in my next blog post due in a day or two.
Daisy
As I said in part one, these QAL supporting blog posts give me the chance to expand on techniques taught in the book in the sort of detail that there just isn’t room for there. And in this post I’ve really gone to town on the detailed technique teaching!
I’m going to be taking you through marking up issues, hand stitching needle-turn applique, preparing shapes and topstitching turned-edge applique with the machine. This is really a tutorial for the techniques relevant to this particular design.
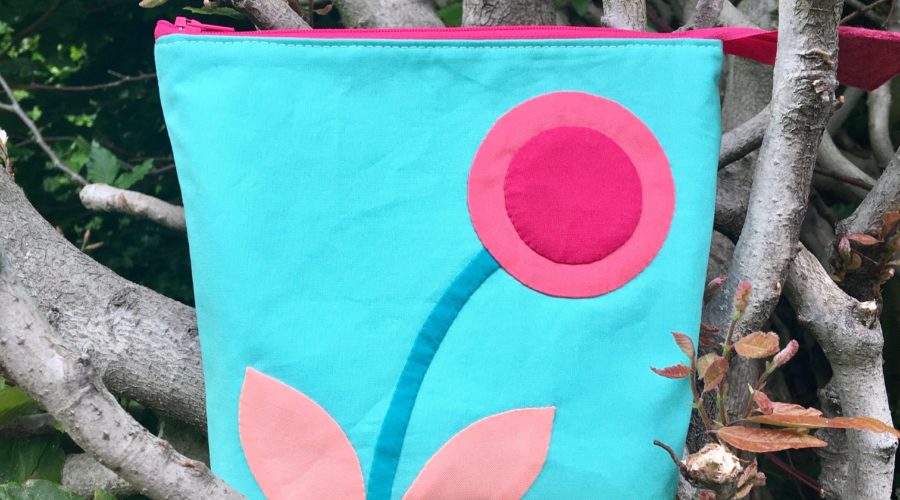
As you can see below and at the top of the post my small project for this row is an Open Wide Pouch, and I used the excellent Noodlehead tutorial here for this. But we’ll talk more about that at the end of the post.

Marking
First of all I am going to apologise to all of you that bought a kit from me because marking up the Essex Linen Black fabric is really hard!!! I’m so sorry!! But I do have a tip that means you only have to do this once!
First of all let’s look at sorting out your pattern piece which is a ‘half pattern’ in the book. I printed off 2 copies as well as the sheets with the daisy circles and leaf template. I turned one of the patterns over and using my light box I traced the markings on to the back. I then stuck the two pieces together along the line indicated.

Before tracing, fold your fabric in half lengthwise and press to get a centre line. You can use this to line up on your middle stem. Leave a gap below the bottom line of 3/8″ so you can trim neatly at the end. The starting background fabric is a little larger then the finished block as hand work can mean fraying edges and fabric distortion.

If you are using the black Essex Linen your first job will be finding something that shows enough to mark with. If I am using a dark fabric I usually use a Clover Sashiko Pen but something about the yarn-dyed fabric means this didn’t show up at all.
In the end I used a pink Pilot Frixion pen which I could see on the fabric (just about!). It’s also hard to see the design through the thick dark fabric (sorry again!!). You can go over the lines with a thicker Sharpie pen and that will help, but it was tricky I’m not going to lie.
So my cheaty method was to stitch my first block and then lay the Essex Linen for the second block on top and do a sort of brass rubbing over it to find out where the circles and leaves went, and mark them where I could feel the raised areas with my fingers. This worked really well for me and it’s how I managed 3 out of 4 of the blocks in my latest quilt!
Also don’t get too hung up on marking accurately. The pattern marking is just a guide for placing the pieces and does not need to be followed slavishly.
Haven’t got a light box? No problem, make a quick and easy light box to help with your tracing. Take a small shallow cardboard box with no lid and pop your phone inside it with the torch function switched on. Place a large square patchwork ruler on the box and trace your pattern on top of this!
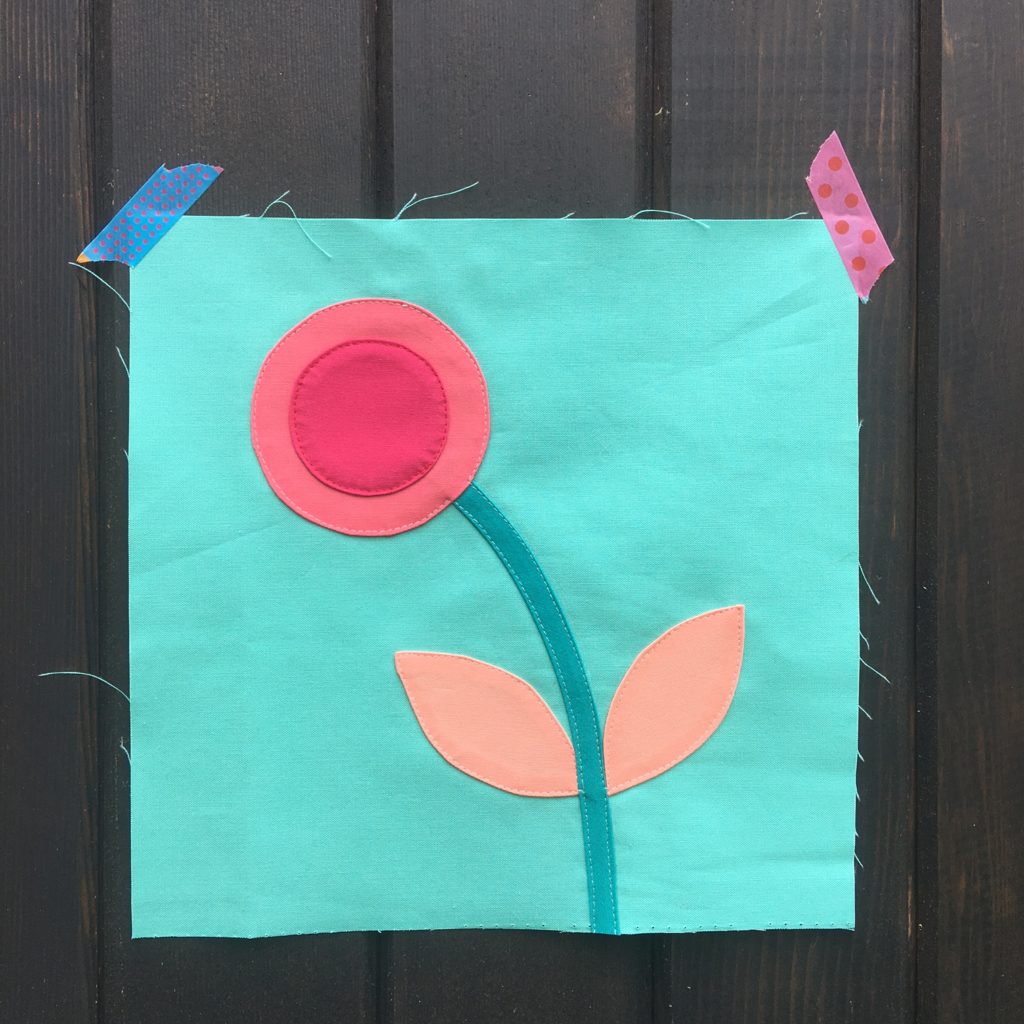
I have made two versions of the block for this post, each using a small portion of the whole block and I just moved my background fabric around the design to adjust the pattern.
Notions
I always use a fine needle for hand stitching, my favourite being a Millward’s Straw Milliners size 10, and fine thread (Aurifil 80wt thread is perfect), this makes my stitches finer too. You can get the Aurifil 80wt in a large range of colours to match your thread but if you just want to try it then my suggestion would be number 2600 (dove grey) or 2000 (off-white). Use the smallest pins you can find for needle-turn applique. Large pins, especially those with bigger heads, get in the way and constantly catch your thread. I recommend Clover applique pins and use these exclusively for all my needle-turn applique.

If you are in the UK all of these items can be bought from my website here and here. I also sell a Needle-turn Applique Starter Kit which contains all of the above plus one more tool and a sheet with useful instructions (similar to this post!). You can also buy this kit from Morris Textiles in the USA.
Needle-turn Applique
We will start by stitching our leaves in place. I have produced a little video to help you with this technique which you can watch below.
I hope this will be a big help but I thought the written instructions would help too:


Before stitching pinch under the raw edges using a scant quarter inch seam allowance (this way your leaf should actually cover your marked lines).
Stitch folded edge to background using tiny slip stitches, just catching the fabric very close to the fold and stitching straight down without slanting your stitch. Stitches should be at least the same distance apart as your seam allowance. Any ‘travelling’ between stitches should happen at the back of the work (your stitches should look longer there).
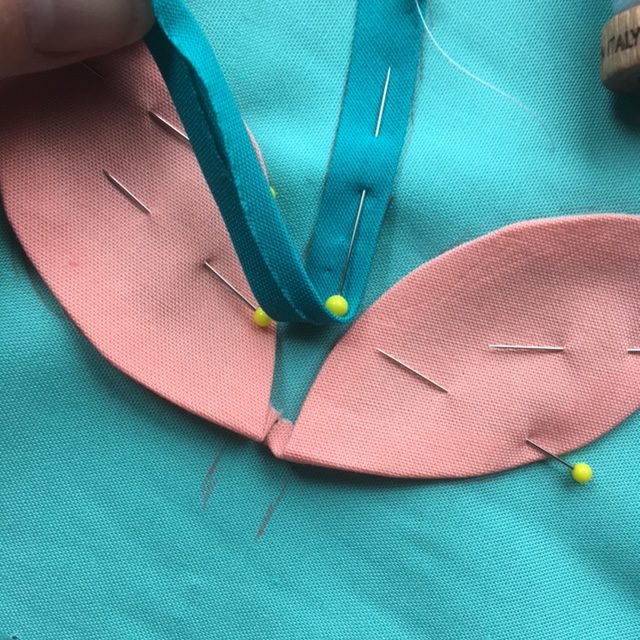
Work around the leaf, pinching seam ahead and using your needle to turn under the raw edges before you stitch them down. Stop stitching at least an inch before the leaf point and fold your seams under so that the ‘dog ear’ is facing away from the side of the leaf you are stitching. When you reach the point use your needle to fold or ‘roll’ the dog ear under the seam as shown. Use closer together stitches to hold in place here. You only need to stitch under one point as the other point will be covered by the stem.

Here is a little photo montage for cutting the bias stems (if you aven’t already done this!). If you start with a strip the right size then work into your fabric you will get larger strips that can be cut in half to make 2 or 3 stems.

If you are making the pouches cut your bias strips a little longer, I used 7″ for the single flower pouch and 8 1/2″ for the double. This is beacuse the pouch has a gusset and I wanted the stem to go all the way to the bottom (and therefore not have to worry about turning under the bottom end).
Take the three bias stems and, wrong side up, press a scant quarter inch seam over so that the raw edges overlap a little. If they completely overlap and your stem is thinner than the one on the pattern then that is absolutely fine, I make mine slightly different each time!
Pin the bias stem in place and stitch up one side and down the other. I switched to a matching thread for this.
Preparing Circles
I always prepare my circles so the edges are turned under perfectly before stitching and this is because it is really hard to get them to look good by using the needle-turn method I showed you for the leaf. An imperfect circle stands out whereas the leaf can have all sorts of slight changes in shape and still look fine.
For both methods make templates using the inner line of the pattern piece.
Card and Foil
I use this method for larger circles but if you like it you can also use it for the smaller inner circle (but it doesn’t work so well for tiny circles). I learnt this method from a blogging friend, Fiona, who learnt it from a free Craftsy video by the needle-turn applique queen, Sarah Fielke.

Place the fabric circle wrong side up on to an aluminium foil square that’s around an inch bigger than your fabric circle.


Place the matching card template on top and carefully enclose it in the foil, pressing tightly all the way round. I would usually do this with two hands but no one was around to help with this photo. Just imagine that my other hand would be pressing down on the card and the hand you can see (above right) is pressing the foil around using the side of the palm. When enclosed spend time smoothing out the foil around the edge with your finger nail (as shown top left of mosaic below). This foil wrapping takes some care and practice and I can’t emphasise enough the difference this will make to your finished circle.

Press very well (really press down hard!), both sides of this foil packet, using your iron on the highest setting. Carefully (it will be hot!) unwrap your foil and take out your fabric circle. If required, you can carefully give your folded edges another press. Using a spray starch or Flatter before wrapping can also be helpful but don’t soak it as that will just ruin the card!

If you prefer you can also use this for the leaf too, either for the hand stitching or for the machine version we will look at soon. If foil wrapping the leaf make sure you clearly fold over one side before folding the other when wrapping the foil. That why you will have clearly defined dog ears both pointing in the same direction.

You can also see in the image above that I simply cut an approx quarter inch seam around my template with my rotary cutter (which is made using the inner line of the pattern piece) rather than using the full pattern piece with seam allowances (as I am too lazy to cut out 2 pattern pieces!)
Paper Gathering
I use this method for smaller circles, it was taught to me by my Japanese friend Hikaru.
Make a paper template using the inner seam allowance, I just use regular printer paper though something a little heavier works slightly better.

With the wrong side of the fabric circle towards you knot thread securely. I placed the paper template on top of the fabric here so you can see that I secured my thread halfway up the seam allowance, this is where you will stitch, approx 1/8th” from raw edge.
Sew a small neat running stitch all the way, the smaller the better. Place paper template in the centre and gently draw up stitches and secure your thread so it has a nice tension (but don’t pull too hard and break your thread!). Press from both sides. Carefully pop the paper piece out.

One thing I want to mention here is a problem I have printing from a laser printer. If I press over printed paper the ink comes off on the iron and therefore the fabric. This never happened when I had an inkjet printer. So I cut my paper circle template from the main pattern rather than the pattern pieces (as that had text in the centre).

Now your circles are prepped you can stitch them on. Sew the larger one first and then the inner. You may wish to cut away the background behind the larger circle before you stitch on the inner. Sometimes you will find that that a background fabric is visible through the fabric on top, carefully cut away the background fabric from behind, using small sharp scissors and leaving a quarter inch seam allowance.
Sometimes I do this and sometimes I don’t depending on the fabric, as you can see in this video of the quilt top on IG.
Machine Sewing Your Turned Edge Applique.
Now I have shown you how to prepare the turned edge of all these pieces you can either pin them all on and hand stitch them as we discussed above or you can machine around them using a neat top stitch! This is basically what I call my Tendrils Technique (though there is one major difference), but let’s just keep that between ourselves so people still book virtual classes with me 😉
Pin all your pieces in place, I usually use regular pins for this not tiny applique pins. The image above shows how to place your leaves so the dog ears are tucked under the stem to start with.
If I was stitching tendrils I would use a matching thread for this as leaf and stems would all be the same colour. But here I have 3 different fabrics to stitch around in one go so I threaded my machine with Aurifil 80wt in 2600 (yes you can use it in the machine too!). I kept my regular 50wt thread in the bobbin though. The only thing you have to watch is the wooden spool, it doesn’t have the smooth surfaces that plastic spools have and my thread caught on a jaggy edge and broke at one point.

I used a size 2.4 stitch. Start stitching at the stem and head up to your first leaf. Stitch around the side that doesn’t have the dog ear and as with the needle-turn stop an inch before the point and use a long pin (or similar) to tuck under you dog ear. This is a little fiddlier than with the hand stitching as it is clamped under the machine! But comes easily with practice. Once tucked under use the pin to hold in place until you stitch up to the point. Swivel around and stitch the other side of the leaf.

Continue up the stem and around the outer circle. Come back down the other side of the stem and around the leaf as you did with the first one.


Finish at the bottom of the stem. I then switched to a red 80wt thread to stitch down my inner circle.
Voila! All sewn on the machine but not a horrible raw edge in sight!!
For those of you who are happy with raw edge applique, just ignore that comment, there is nothing wrong with it at all, I just have a very personal problem with it!

I’m super pleased with how this turned out, the top stitching using the Aurifil 80wt thread looks so neat! I might even prefer it to the hand stitched version…
Daisy Small Project
As I mentioned at the top I have made my daisy blocks into two Open Wide Pouches.


I made the first using this fabulous bespoke Liberty Tana Lawn range by Queen of Fabrics. Emma used prints from the Liberty archives to design this range and I love them all!
I wanted to use that lovely bird fabric as the background but had to seam it as I only had small pieces. I only had enough fabric width to include 2 leaves so I put the 2 stems together and a leaf either side.

When I finished the hand stitching (which is lovely to do with the tana lawn as it’s so fine and tucking the point under is a dream!) I trimmed it so I had an inch clear of the circle at the top and 1 1/4″ either side. I also left at least 2″ beneath the leaves for a gusset. I basted it to a piece of wadding and hand quilted using Aurifil 12wt wool in matching shades.
I trimmed it again to a final measurement of W11 1/2″ x H9 1/2″. I used a 1″ gusset for the pouch. My zip was 20″ (as that was all I had in the right colour) so I trimmed a lot off. I think a 14″ zip would be perfect for this.
The back is made using the same fabric line and is a porthole technique class sample from The Thread House Virtual Retreat 7 which was at the weekend. I hand quilted this too.
It’s a very low-contrast look but I love how vintage-style and almost faded it’s turned out. It was the perfect birthday gift for a friend and has already gone to it’s new owner!

For the second pouch I started with background fabric that was a 9″ square. Here is the finished needle-turn side.
I just used a single flower and I flipped it so that it was reversed on the other side. I didn’t quilt this one but I did use an iron-on interfacing, as I did on the lining fabric of both pouches (a personal choice but I prefer it).
Again I used a 1″ gusset and a 12″ zip. I used felt to make the zip covers for both pouches, as then you don’t need to turn the edges in. If you take a look at Anna’s tutorial this will all make sense!
I think I’m going to keep this one 🙂

The Daisy Sponsored Prize!
Our sponsor for part two of the QAL is Sew and Quilt. Founded in September 2012 by Jessie Fincham Sew and Quilt are a one-of-a-kind destination for those who love EPP and patchwork. They offer their own range of Sew & Quilt paper pieces, made at their idyllic location in West Cornwall and available directly from them.
I met Jesse many years ago at the Fat Quarterly Retreat when we were both getting started with our quilting businesses and we’ve stayed in touch ever since mainly through my annual visits to their incredibly busy stand at Festival of Quilts. When I wanted to find a shop that could offer a kit version that was similar to my original Bedding Plants quilt I knew just where to go and Jessie put together the perfect selection.

Jessie has thrown herself into the QAL and made her own version of the daisy block above. Isn’t it perfect?! Jessie has kindly donated this amazing bundle of pretty vintage fabric for the giveaway prize. It’s all the FQs from the kit she put together for the Bedding Plants QAL, 28 FQs in total (23 prints and 5 AGF Pure Elements Solids). Head to Sew and Quilt’s website here and check out their offering, you won’t be disappointed!
To enter the giveaway all you need to do is use the hashtag #beddingplantsQALDaisy when you post your Daisy blocks in your feed on Instagram, or share your Daisy blocks in a post in the Bedding Plants QAL Facebook group. I will choose a random winner from the combined IG and FB posts of Daisy blocks. You have from now until midnight GMT Saturday 19th June to share your Daisy blocks on either platform. I will draw a winner on Sunday 20th June and post in both places.

Well I think that’s it for our second Bedding Plants QAL post! Phew!! Remember as your host I am here to help, so if you have any questions just comment below or send me an email to [email protected].
Have fun everyone and I can’t wait to see all your lovely daisies!
Thanks Jo. Great blog pot
Great post Jo and I know I’ll refer back to it once I get to this row. I’ve only done two of my rose blocks and am going to make a slightly smaller quilt & have already planned how it may come together. I’ve a lot on the go at the moment, but did put up a post last night with my first rose block & I’m using “scraps” for mine. I don’t do FB or IG, so will have to rely on my blog. I’ve a friend joining in now too & she has a friend who is doing it too, so looks like it is going to be very popular. Thanks for sharing, take care & hugs.
I’m Susan’s friend joining in 🙂 And roped another friend in! Almost finished row 1, and really enjoying it, so thank you for hosting this fun QAL! xx
Thanks Jo for brilliant tutorials on how to do the needle turn appliqué. These tips will be helpful for lots of projects and will be referred to more than once I’m sure. Loving making the quilt so far. Regards Jenny x
Thank you Jo!! I hated my Daisy. I was trying many different ways to do them. All looked awful. Thank you for the pointers. I will try again using your method.